Showing posts with label Valentine's Day. Show all posts

Friday, February 11, 2011

XOXO Valentine Blocks

If you follow my blog, I'm sure you have seen similar blocks before.
Here is my set of Teacher Name Blocks and here are my Joy Blocks.
These blocks have been on clearance for some time at Hobby Lobby. They were originally priced at $1.99 and were marked down to $0.26. As time went on, it was pretty slim-pickins. Last time I was there, I noticed that there were a bunch of Xs left. I thought to myself, what would people use Xs for? Then it hit me!--Valentine's Day for XOXO :)
I started by painting the blocks brown.


Then I cut and mod podged some scrapbook paper to the letters and to the sides of the blocks.


I cut out and layered some hearts to add to the top.

To hold the heard, I used pink and red paperclips. I simply straightened them out and then wrapped them around a pencil to give them that twirl effect.


Again, I live with my parents, so needless to say I don't have very much space to decorate.
I like to decorate the top of this little bookcase.

If you missed my Valentine's Subway Tile or
Paint Chip Heart Garland, feel free to check them out.


Linked to...

Trendy Treehouse
My Romantic Home
The Shabby Nest


Wednesday, February 9, 2011

Valentine Garland

I love paint chips!
They are free and pretty.

I collected a bunch in shades of pink and red.
I cut them apart and cut the words off.


Using my Cricut, I cut a bunch of hearts.


I glued hearts back to back with thread between them to create heart garland


Mine hearts are pretty tiny, but you could make them bigger if you wanted.


Linked to...

Wednesday, February 2, 2011

Valentine's Day Wreath

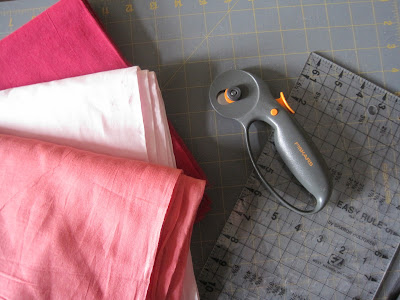
I started with some cheapo fabric.  I had 2 yards of each color, but only used a yard of each.
It doesn't have to be high quality fabric, mine was $1.00 a yard.  Clearance Baby!!


 I used this fancy cutting tool and mat of my mom's.  I don't know what its called, but I have seen her cut fabric for quilts with it, so I'm assuming that is the purpose of it.


 I didn't measure anything accept the length.  The length of all the pieces were the same (or a least close) and the width was just wherever I happen cut it.  Pretty mathematically calculated, I know.


So, basically cut a billion strips, like so.


Then using a wreath from the Dollar Tree, I tied the fabric around the wreath.


I found it most time effective, to just tie lie this...


... and then just mush them together, by sliding them down.  Again, I know this tutorial is awesome:  mushing, spastic cutting.... yeah I'm pretty much a professional. 


It will begin to look like so.  Tie away as you watch TV.


Back view. 


It is really easy, and requires almost no skill.  I mean hey, if I can do it anyone can.  Material and I aren't friends, but this project may have brought us closer.


Now that the wreath part was done, I wanted to add something to the middle.

I found this 'x' and 'o' in the Christmas clearance at Hobby Lobby.  They were 90% off, so I paid a total of 20 cents.


They have a candy cane detail, but I thought I could make it 
looked stripped by using reds and pinks.   
FAIL!  


So, I just painted the entire thing pink.
PARTIAL FAIL!


I wasn't loving the plain pink because you could still see the candy cane lines.  So I Elmer Glued them up and glittered until my heart was content.  You can still see a little of the pink coming through the glitter and I like it.  Actually, it was my plan all along.  
(Haha, right Michelle, whatever makes you feel better.)


The final product.


Fabric:  $3.00
Letters:  $0.20
Wreath:  $1.00
Glitter, Glue, and other Crap:  on hand

Monday, January 31, 2011

Can of Love


I made the bf a cute gift.  Kinda girly, but hey, I like it.
I didn't spend any money because everything I had was on hand. 
It's super simple and makes a great gift for the special someone.


I used scrapbook paper, glue, and my cutting thingy for the first part of my project.


I typed up 14 things that I love about my bf.
The plan is that he can open one up starting February 1st until Valentine's Day.

(Note:  I realize the only thing you can read on #2 is, "I love how give me butt even after 5.." 
Please don't think I am some kind of weird freak, it says, 
"I love how you give me butterflies even after 5 years.)


I glued the little slips of paper to a pieces of scrapbook paper.


Then, I folded them up, like so.


I used one of those safe can openers (you know the ones that don't leave sharp edges) and cut the bottom off of a pop-top soup can.  Then I ate the soup.  It was good.


I stuffed in the little slips of paper with some of that easter grassy like stuff.


Then, I used Elmer's glue to glue on the lid. 
 I would have used super glue, but I couldn't find it.
The Elmer's glue wasn't really doing so well and I didn't feel like sitting there holding it until it dried.
So, I used a headband as a vise to secure it while it dried.


I placed scrapbook paper around the can and used ribbon as a border on the top and bottom.
For the label, I just layered some scrapbook paper and added white vinyl letters.


So when I give it to the bf, the will have to pop open the top and read one note each day.
I heart valentine's day <3


Related Posts Plugin for WordPress, Blogger...