Monday, January 31, 2011

Can of Love


I made the bf a cute gift.  Kinda girly, but hey, I like it.
I didn't spend any money because everything I had was on hand. 
It's super simple and makes a great gift for the special someone.


I used scrapbook paper, glue, and my cutting thingy for the first part of my project.


I typed up 14 things that I love about my bf.
The plan is that he can open one up starting February 1st until Valentine's Day.

(Note:  I realize the only thing you can read on #2 is, "I love how give me butt even after 5.." 
Please don't think I am some kind of weird freak, it says, 
"I love how you give me butterflies even after 5 years.)


I glued the little slips of paper to a pieces of scrapbook paper.


Then, I folded them up, like so.


I used one of those safe can openers (you know the ones that don't leave sharp edges) and cut the bottom off of a pop-top soup can.  Then I ate the soup.  It was good.


I stuffed in the little slips of paper with some of that easter grassy like stuff.


Then, I used Elmer's glue to glue on the lid. 
 I would have used super glue, but I couldn't find it.
The Elmer's glue wasn't really doing so well and I didn't feel like sitting there holding it until it dried.
So, I used a headband as a vise to secure it while it dried.


I placed scrapbook paper around the can and used ribbon as a border on the top and bottom.
For the label, I just layered some scrapbook paper and added white vinyl letters.


So when I give it to the bf, the will have to pop open the top and read one note each day.
I heart valentine's day <3


Saturday, January 29, 2011

Scrappy Saturday #2

It's Scrappy Saturday!

In 2008, I ran 2 half marathons. 
Today, I'll show you the two layouts I created.


The first one was the Eisenhower Half Marathon in Abilene, Kansas.
It was my very first half marathon.


The other half marathon I ran was in Omaha, Nebraska. 
It was much bigger than the one in Abilene and was an amazing experience. 
 There were tons of people and live music throughout the course. 
My aunt and dad ran with me.


Friday, January 28, 2011

Candy Container = Scrapbook Storage

I found these little plastic jars with candy on clearance for 50 cents each.
I really didn't want the candy, just the containers.


I believe in buying from the clearance section is smart, but it's usually not a good idea to buy clearance food.
This candy was absolutely horrible.  I threw some of it away, and gave some of it to my dad. 
He thought it was good, but he'll eat anything!


All  I needed for this project was some scrapbook paper,
 ribbon, and scotch tape sticky strip things.


I used my Cricut to cut out circles for the lids.


I put circles on the side too.
The one on the left has buttons and the one on the right has little foam letters.


My Cricut pens are in the left container.
Leftover pieces of ribbon are held in the right one.


Here they are in my scrapbook area.


I think they are cute!  Plus, they were super easy to make :)

Thursday, January 27, 2011

Vinyl Storage

I recently discovered the gloriousness of vinyl. 
I have a ton of colors and needed a way to get it organized.
I found this wooden crate at Michael's on clearance.


My first step was to paint it white.  I forgot to take a photo of this step.


I added a large black ribbon around the crate. 
Then, I created a label by layering some paper and then adding
 the word "vinyl" in white vinyl using my Cricut. 
(Of course, I had to use vinyl.)


Another view.


Close up view of the label. 
I'm trying to keep my scrapbook organization/decor in black and white. 
I love how it looks with all the bright colors of vinyl.


Here's how it looks in my scrapbook area.

Wednesday, January 26, 2011

Sticker Notebook

I previously blogged about my new way to organize my stickers. 
If you missed it, you can find it here.

When I blogged about my organizing, I hadn't prettied it up yet. 
And there were also a flaw in my design.


All my stickers were put in plastic sleeves. 
Nothing wrong here-loving it.


I wanted tab dividers that would stick out past the page protector so I mad these out of 12 x 12 paper.
This was not working for me.  I liked that they were big and cute, but they were not functional.
Problem.


The paper was bending and it was difficult to flip from tab to tab.


The three-hole-punch holes were starting to get jacked up.


My solution for all these issues was to laminate the tabs.
(I'm not sure why I took a picture of the Spanish directions?!?)


It's just basically clear contact paper. 
 It's not as sturdy as if you were to use a laminating machine,
 but it's much cheaper and super simple.


I used a ton of contact paper, but it was total worth. 
 No more tab problems.


~~~~~~~~~~~~

The other thing I needed to do was to beautify the covers a bit. 
They were way to plain before.


The front covers:
 (book 1)


(book 2)


Both of the sides are the same for the two binders. 
 Simple and labeled.


Tuesday, January 25, 2011

i heart cheap pillows!


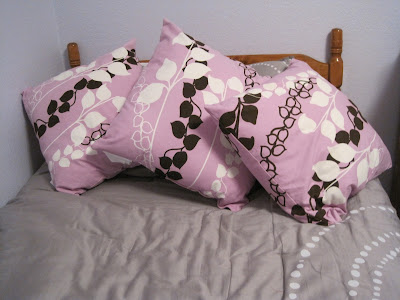
 I'm in the process of redecorating my room.  My bedding is silver and my walls are purple.  That is about as far as I have gotten.  

I have had my eye on these pillows for quite some time.  They are from Bed, Bath, and Beyond and are priced at $19.99.


I love pillows and I knew I wanted 3 of them, but that would be about $60... and I am WAY to cheap for that nonsense.


So, I waited patiently. 
On one of my many trips to BB&B, I noticed they were marked down to $9.99! 
Ok, now we are getting somewhere, but I still held out.


On my last trip to town, I went by to visit my little pillows in hopes of a smaller price. 
The gates of heaven opened and I see this little beauty of a sticker.
75% off the LOWEST ticketed price!!!


So, I did a little happy dance in the store and put three of them in my shopping cart. 
I was ecstatic, I'm thinking that I was about to get 3 pillows for $2.50 each.
That's $60 worth of awesomeness for $7.50!!

I marched my happy little buns up to the register and God smiled upon me!!!
When the nice lady rung them up, they were actually $1.50!!!!!!

Are you getting this?!?!
I bought $60.00 worth of pillows for less than $5.00!!!!
Okay, maybe I'm a little too excited about this...

Related Posts Plugin for WordPress, Blogger...